- Home
- Raising Goldfish Fry (babies)
- Brine Shrimp
- Brine Shrimp Hatchery
Brine Shrimp Hatchery
How to Make a Brine Shrimp Hatchery.
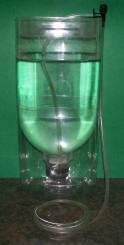 Brine Shrimp hatchery
Building a brine shrimp hatchery is very low tech and relatively cheap, but it will be one of the most useful pieces of equipment you own if you want to breed Goldfish.
Items You Will Need
- Small aquarium or container large enough to hold two 1-3 quart (liter) plastic containers such as those used for fruit juice
- Two 1-3 quart (liter) clear plastic drink bottles with tops (square or oblong are best)
Note: a 1 quart container can hatch 560,000 nauplii so unless you are a commercial operation, this size should be big enough for most spawns. (For this exercise I am using 3 liter juice containers).
- Plastic air line ¼” or similar
- Aquarium air control valves (3)
- Aquarium air pump
- Aquarium heater/thermostat
- Rigid plastic tubing or air stones.
Construction Method
Measure up 1 ¼” from the base of the two containers and evenly cut off the bases. You will use these later as lids.
The containers are turned upside down and float top down in the aquarium.
The reason the containers are turned upside down is because nauplii eggs or cysts tend to sink to the bottom of the hatching container. Ideally they should stay suspended in the water column until they hatch. By placing an air stone in the neck of the container eggs that sink to the bottom are picked up by the bubbles and returned to the water column.
Punch a hole in the middle of the bases. Make the holes slightly smaller than the air line you will be using. Make another small hole in the bases at the lowest point so any water that gets into it will drain back into the container.
Push some air line through the hole in the base. You will invert the bases and use them as lids to control evaporation and splashing. Depending on whether you are using rigid plastic tubing or air stones, push enough air line through so the tube or air line reaches to the bottom of the container when the lid is in place.
You should end up with something as shown in the picture below. Note the air control valve at the top, and in this example an air stone with a lead weight attached is used instead of rigid tubing.
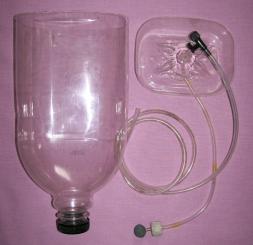 Brine shrimp hatchery components
Putting the Brine Shrimp Hatchery Together
If you live where the temperature never drops below 75oF, you can dispense with the aquarium and heater and just make up a suitable stand for the two containers utilizing bases made from similar containers (see the picture below). If not, you will need to use the aquarium to keep the cysts at the correct temperature.
The left hand picture shows a 3 liter container with the top cut off. Use masking tape or similar as a guide for the cut line.
The right hand picture shows another 3 liter container inserted upside down into the bottom section.
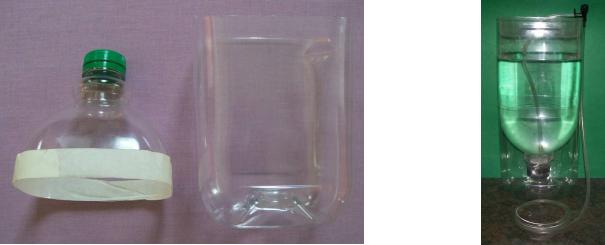 Brine shrimp hatchery stand and on the right the hatchery mounted top down in the stand
Even if you do use an aquarium to heat your hatchery, the stand described above is useful for mounting your hatchery in while harvesting the nauplii.
The stand tends to fog up when the hatchery is placed in it. I cut a hole in the side so I can view the neck of the hatchery where the brine shrimp nauplii gather. This makes it easier to see the siphon tube and avoid unhatched cysts while siphoning out the nauplii.
- Fill the aquarium with enough water so the two containers float without touching the bottom.
- Install the heater/thermostat in the aquarium set to 80oF (26-28oC). Don’t turn it on just yet.
- Fill the two containers with a measured amount of water that allows them to float freely in the aquarium without tipping over.
- Calculate how much salt and baking soda you need for the size of your containers, (usually 2 tablespoons of un-iodised salt per quart and a pinch of baking soda). Add this to the containers.
- Hook up all your air lines, one for each container and one for the aquarium. The aquarium air line is just to circulate the water to keep the heat even.
Plug in the heater and air pump.
Tip:
Check the bubble size from the air stones in the containers. If they are too fine, they tend to bubble the cysts out of the water which then collect up the sides. Rigid plastic tubing has the advantage of producing large bubbles which don’t lift the cysts out of the water.
You are now ready to seed the brine shrimp hatchery with the first batch of cysts that will start hatching in the next 24-36 hours.
If you don't want to make your own, there are a few brine shrimp hatcheries available from www.amazon.com, but none look like ideal solutions. They either utilize a drink bottle as I have done or appear overly complicated.
I use San Francisco Bay Brand brine shrimp eggs because I get an excellent hatch rate from this brand
Top of Brine Shrimp Hatchery page
